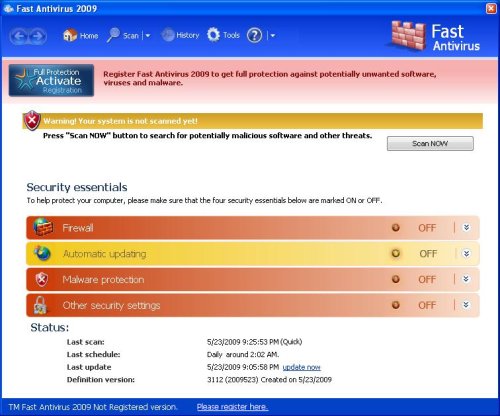
Fast Antivirus 2009 is a rogue antivirus/antispyware program from Virus Doctor rogue family (Malware Catcher 2009, Extra Antivirus, Virus Sweeper, Ultra Antivir2009, Virus Alert, Virus Melt …). During installation, Fast Antivirus 2009 configures itself to run automatically every time, when you boot your PC. In addition the program drops a few files. These files are are actually harmless, but during the scan will determine as infections. Once running, Fast Antivirus 2009 will scan your computer and list previously created files as threats that cannot be removed unless you first purchase the software.

Fast Antivirus 2009
While Fast Antivirus 2009 is running, you will see security warning. These warnings are a fake and should be ignored! Computer users are urged to avoid purchasing this bogus program! Use the free removal instructions below in order to remove Fast Antivirus 2009 and any other trojan infections.
Symptoms in a HijackThis Log
O4 – HKCU\..\Run: [Fast Antivirus 2009] “C:\Documents and Settings\All Users\Application Data\a3dcd31\FastAV.exe” /s /d
Use the following instructions to remove Fast Antivirus 2009 (Removal guide)
Download MalwareBytes Anti-malware (MBAM). Close all programs and Windows on your computer.
Double Click mbam-setup.exe to install the application. When the installation begins, keep following the prompts in order to continue with the installation process. Do not make any changes to default settings and when the program has finished installing, make sure a checkmark is placed next to Update Malwarebytes’ Anti-Malware and Launch Malwarebytes’ Anti-Malware, then click Finish.
If an update is found, it will download and install the latest version.
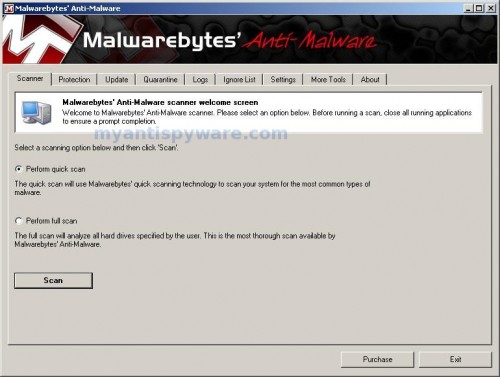
Once the program has loaded you will see window similar to the one below.

Malwarebytes Anti-Malware Window
Select “Perform Quick Scan”, then click Scan. The scan may take some time to finish,so please be patient.
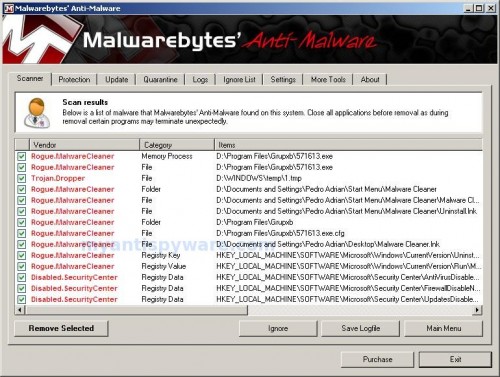
When the scan is complete, click OK, then Show Results to view the results. You will see a list of infected items similar as shown below. Note: list of infected items may be different than what is shown in the image below.

Malwarebytes Anti-malware, list of infected items
Make sure that everything is checked, and click Remove Selected. When disinfection is completed, a log will open in Notepad and you may be prompted to Restart.
Note: if you need help with the instructions, then post your questions in our Spyware Removal forum.
Fast Antivirus 2009 creates the following files and folders
c:\Documents and Settings\All Users\Application Data\a3dcd31
c:\Documents and Settings\All Users\Application Data\a3dcd31\FastAV.exe
c:\Documents and Settings\All Users\Application Data\a3dcd31\mozcrt19.dll
c:\Documents and Settings\All Users\Application Data\a3dcd31\sqlite3.dll
c:\Documents and Settings\All Users\Application Data\a3dcd31\SysFld
c:\Documents and Settings\All Users\Application Data\a3dcd31\SysFld\vd952342.bd
c:\Documents and Settings\All Users\Application Data\SysFld
c:\Documents and Settings\All Users\Application Data\SysFld\fastav.cfg
%UserProfile%\Start Menu\Fast Antivirus 2009.lnk
%UserProfile%\Start Menu\Programs\Fast Antivirus 2009.lnk
%UserProfile%\Application Data\Fast Antivirus 2009
%UserProfile%\Application Data\Fast Antivirus 2009\cookies.sqlite
%UserProfile%\Application Data\Fast Antivirus 2009\Instructions.ini
%UserProfile%\Application Data\Microsoft\Internet Explorer\Quick Launch\Fast Antivirus 2009.lnk


